
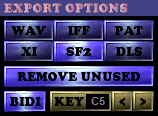
This is where you select the format that you want the samples to be exported in.
WAV
Selects the WAV (Windows PCM) format for sample exporting. WAV does allow bi-directional loops, but some software might not support them, so you may set the BIDI option to have 2MIDI convert them to plain forward loops. WAV does not allow multi-samples, so multi-sample instruments are split.
AIF
Selects the AIF (Audio Interchange File Format) format for sample exporting. AIF does allow bi-directional loops, but some software might not support them, so you may set the BIDI option to have 2MIDI convert them to plain forward loops. AIF does not allow multi-samples, so multi-sample instruments are split.
PAT
Selects the PAT (Gravis Ultrasound patch) format for sample exporting. PAT does allow bi-directional loops and multi-sample instruments.
XI
Selects the XI (FastTracker 2 instrument) format for sample exporting. XI does allow bi-directional loops and multi-sample instruments.
SF2
Selects the SF2 (SoundBlaster/Creative SoundFont) format for sample exporting. SF2 files contain complete instrument banks, so only one file is exported containing all the samples. SF2 does not allow bi-directional loops, so you must set the BIDI option to keep them. SF2 only allows 16-bit samples, so 8-bit samples have to be converted by 2MIDI (doubling their size).
DLS
Selects the DLS (Downloadable Sounds) format for sample exporting. DLS files are similar to SF2 files, all the samples are exported in a single file. DLS does not allow bi-directional loops, so you must set the BIDI option to keep them. DLS does not allow a mix of 8-bit and 16-bit samples. So if there are any 16-bit samples then all 8-bit samples have to be converted to 16-bit by 2MIDI (doubling their size).
BIDI
Converts bi-directional loops to plain forward loops by mirroring the sample data (doubling the loop's length).
TRIM
Trims the length of looped samples to the end of the loop.
MAP
Writes a .map file containing a list of sample to patch and drum key mappings, or an ultrasnd.ini file in the case of PAT format exporting.
REMOVE UNUSED
Stops unused samples from being exported.
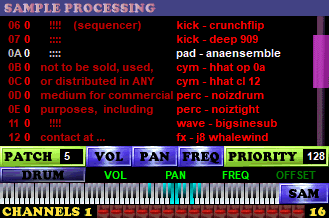
This is where you set how the samples are to be handled. To edit the handling of a sample you must first select it from the list of samples. The currently selected sample is white, the others are red. The instrument names are on the left, the sample names are on the right. Only actual samples are listed, zero length samples are not. Unused samples are dimmed. Samples with sustain loops (which cannot be retained when exported) are yellow. You can right click on a sample to see some information on it (see below). When you've selected a sample, you can change how it's processed using the controls below.
PATCH
Selects the MIDI patch that the instrument/sample will use. When exporting in a format that keeps multi-sample instruments together, the same patch number is obviously shared by all samples in an instrument. If the current sample is assigned to the drum channel, then the patch number is the sample's base key on the drum channel. If you press the spacebar, 2MIDI will automatically select the lowest free patch number.
VOL / PAN / FREQ
Use these switches to select whether you want the instrument's volume, pan and frequency information to be converted into the MIDI file. Volume information includes the volume envelope and fadeout. Pan information is the pan envelope. Frequency information is the instrument vibrato. There is a white circle in the top-left corner of the VOL/PAN/FREQ switches if the current instrument uses any volume/pan/frequency information.
PRIORITY
This is where you set the priority of the current sample. This value can range from 0 (lowest) to 255 (highest). See the prioritization section for further information.
DRUM
This switch toggles whether the sample is converted in the drum channel. Multi-sample instruments can't be assigned to the drum channel, unless you are exporting in a format that does not keep multi-sample instruments together. When a sample is converted in the drum channel, all volume/pan/frequency changes are lost because otherwise they would affect any other samples that are also playing on the drum channel. The green VOL/PAN/FREQ/OFFSET lights will be lit if any changes to the volume/pan/frequency/offset of the sample are made at any point in the MOD file. If all these lights are out and no instrument volume/pan/frequency information is used, then the sample can be 100% accurately converted to the drum channel. See the drum channel section for further information.
SAM / DRUM
This switch toggles the piano keyboard between displaying the keys to which the current sample is assigned to, and displaying the keys of the drum channel that currently have a sample assigned.
When it is displaying the current sample (SAM), the keys that the sample is assigned to will be either cyan (key is used) or white (key is unused). If the sample is not assigned to a key, the key will be dark grey. You can click on a key to hear the sample being played at that key (note that the sample playback rate is limited to 100khz).
When it is displaying the drum channel (DRUM), the keys that the current sample is assigned to are cyan, other keys that have a sample assigned are white. If there are any conflicts (more than one sample assigned to the same key), the key will be red. You can click on a key to assign the current sample to that base key on the drum channel.
CHANNELS 1 ... 16
These 16 switches are used to select which MIDI channels you want each sample to be able to use in the conversion. If the sample is being converted on the drum channel, then these channel assignment switches are ignored. For a sample to be converted on a MIDI channel, the channel must be enabled (using these switches), and the channel must also be assigned to the MOD channel on which the sample is played. When exporting in a format that keeps multi-sample instruments together, all the samples in an instrument will have the same channel assignment. See the channel allocation section for further information.
This is the information that is shown when you right-click on a sample, or if you leave the mouse over it for a second. "C +1%" is the sample's dominant key, this can be useful to know for tuning purposes. Note that if the sample is not a single note, then this value is unlikely to be useful. "8 bit" is the sample's resolution (ie. 8 or 16 bit). "34635 samples" is the sample's length. "bidi loop 25458 to 34635" is the sample's loop points, "bidi" means that it's a bi-directional loop. "used 15 times" is the number of times that the sample is played in the MOD.

AUTO DRUMS
This option will make 2MIDI automatically assign suitable samples to the drum channel. Suitable samples are those that will convert 100% accurately to the drum channel, which are those that do not use any instrument volume/pan envelopes or vibrato, and do not use any volume/pan/frequency/offset changes. This option is applied when clicking the RESET button.
RESET
This will reset the PATCH and PRIORITY settings for all the samples. It will also reset the MIDI channel assignment for all samples. The patch numbers are set sequentially, if there are 5 samples, they will use patch numbers 0,1,2,3,4. If the AUTO DRUMS option is enabled then suitable samples will be assigned to the drum channel. The priority of all samples is set to 128 (middle). You should click this button each time you change the export format from one that supports multi-samples to one that doesn't, and vice-versa, to ensure that the patch numbers are valid. You should also use this after you change the REMOVE UNUSED setting. This function is automatically applied everytime you load a MOD file.
VOL / PAN / FREQ
These buttons toggle the processing of the instrument volume/pan/frequency information respectively for all samples.